How to Setup Salesforce Mobile SDK for Native Android App Development?
Develop native Android apps using Salesforce Mobile SDK
I am a Software Engineer currently working as Salesforce Developer with hands-on experience in Apex development along with declarative development.
Salesforce Mobile SDK gives developers the tools to build custom mobile apps with unique user experiences. In this article, I will walk you through what are all the installations we need to do to get started with using Salesforce Mobile SDK with Android Studio.
Just follow the below steps in the same order and if you have already completed a step then feel free to skip it.
Step 1: Install Node.js with NPM
First, check if Node.js and NPM are already installed on your machine. To check type: npm -v in the command prompt/terminal.
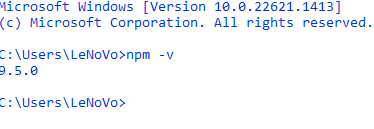
If it returns version 3.10 or later then you can jump to step 2. And if the command returns an earlier version or Node.js & NPM are not installed in your system then go to Node.js and install the latest version for your operating system.
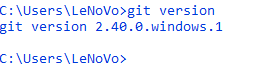
Step 2: Install the Git Command Line
To check if Git is already installed type git version on the command prompt/terminal. If the Command line shows a version then jump to step 3 else download and install Git from here.
Step 3: Install Java Development Kit
To check Java Version on your machine type java -version on the command prompt/terminal. If it shows version 11.x or later then jump to step 4 else download and install the latest JDK from here.
Step 4: Install Android Studio Latest
As you are about to use Salesforce Mobile SDK for Native Android App development and Android Studio is required for that. If you have already installed Android Studio then check the Android SDK Version by following Step 5.
If you don't have it installed then download and install it from here. While it is getting installed you can drink some coffee because android studio installation takes time.
Step 5: Install the Required Android SDK Version
Salesforce Mobile SDK 10.0 uses Android Nougat (API 24) as its minimum and Android 12 (API 32) as its target.
If you have already installed the correct SDK version then jump to Step 6 and install Forcedroid.
If you don't have the correct version installed then follow the steps from the below image.
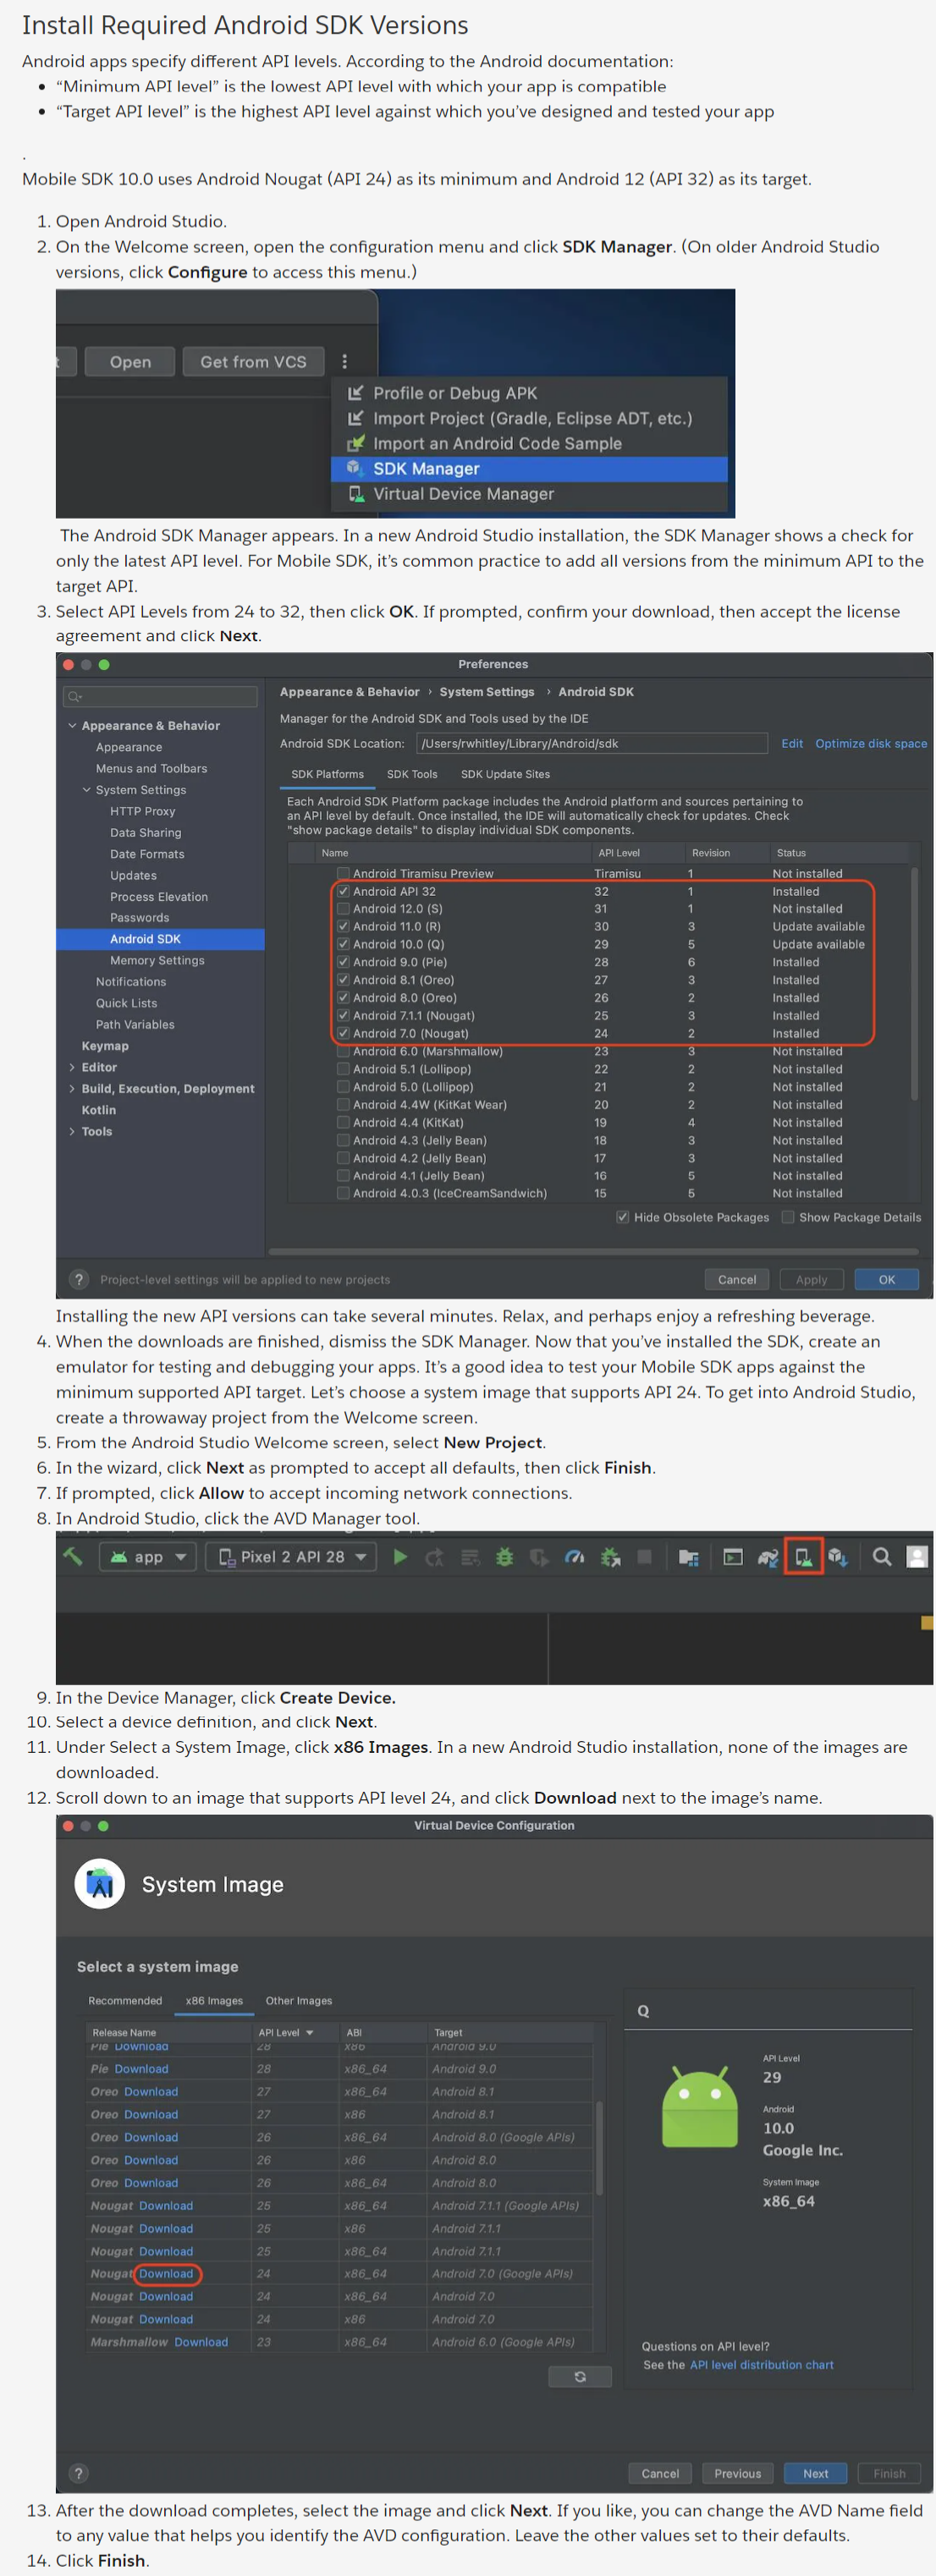
This image is taken from Trailhead. You can find the unit here.
Step 6: Install Forcedroid
Forcedroid is a node.js command line utility that helps us create native android apps which are compatible with Mobile SDK.
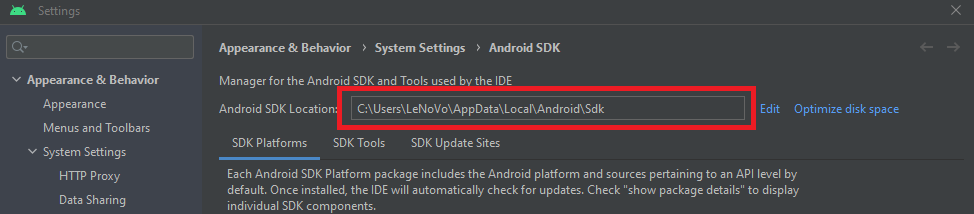
Before creating an Android app we need to create a System Variable ANDROID_HOME which will point to the installed Android SDK. But how to find Android SDK? Follow the below steps for that.
Open Android Studio.
Click on Icon which has help text as SDK Manager as highlighted in the below image.

Now you will see the path as highlighted below image. Copy the complete path.
Now create a System variable and save it. If you don't know how to create an environment variable then let me know in the comments. I will share an article for the same.
Let's come back to installing Forcedroid if you are a windows user then run npm install -g forcedroid from the command prompt. All Linux/mac users run sudo npm install -g forcedroid from the terminal.
To verify the installation run forcedroid version you will see forcedroid version like the image below.

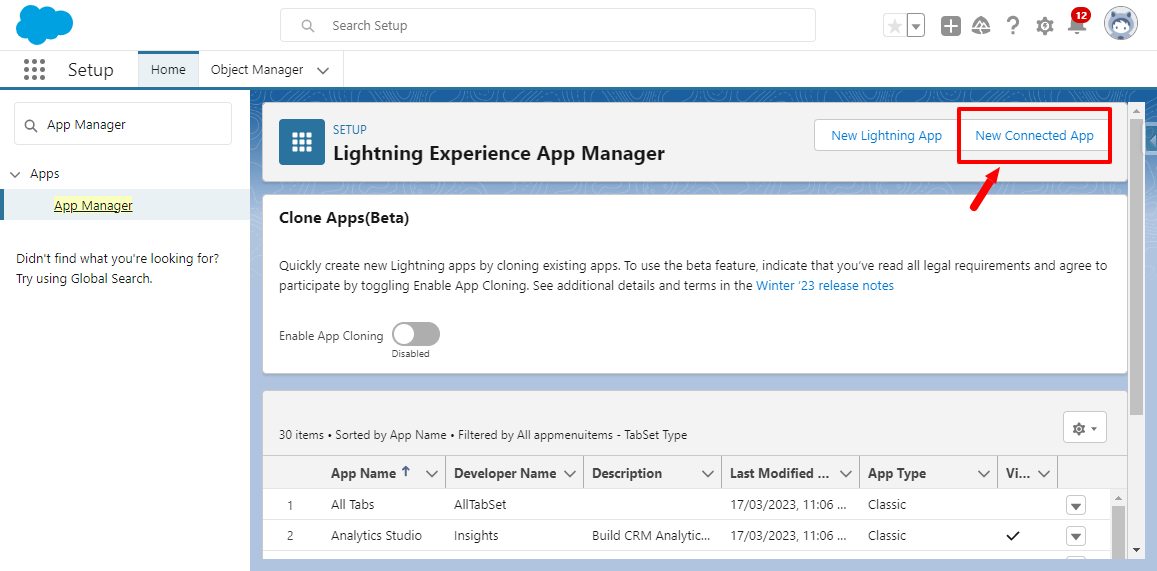
Step 7: Create a Connected App in Salesforce Org
As a Salesforce Developer you already know how to create a connected app but let me walk you through all the required steps so we don't make any mistakes. Please follow the below steps to create a connected app.
Login to your Salesforce Developer Edition org.
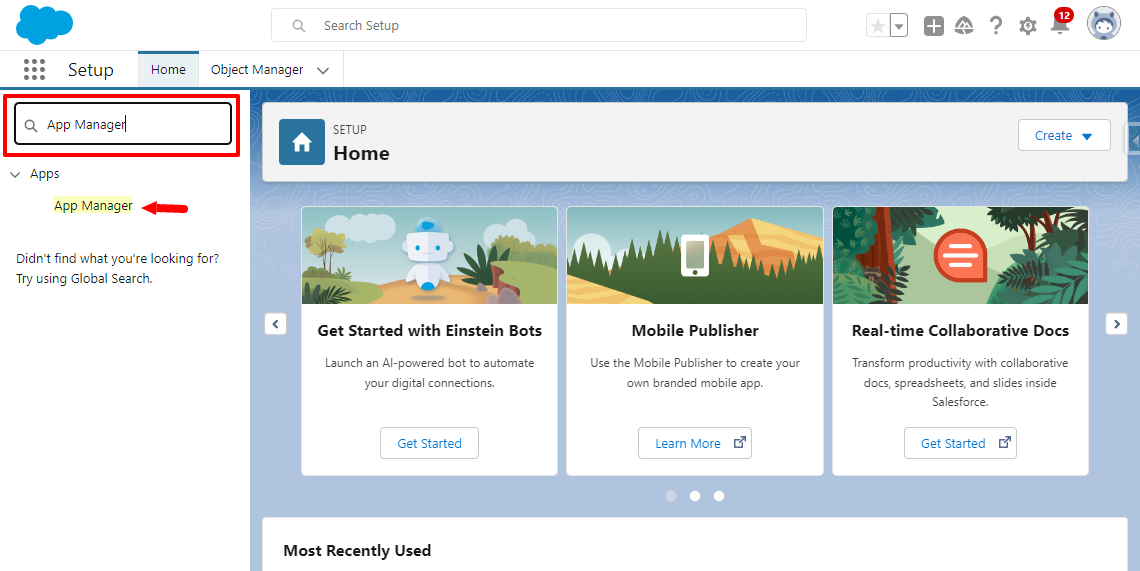
Click on the gear icon to go to setup.
Search for App Manager and click on App Manager.
Click on New Connected App.
Enter a value in Connected App Name.
Accept the populated API Name.
Enter your email address in Contact Email.
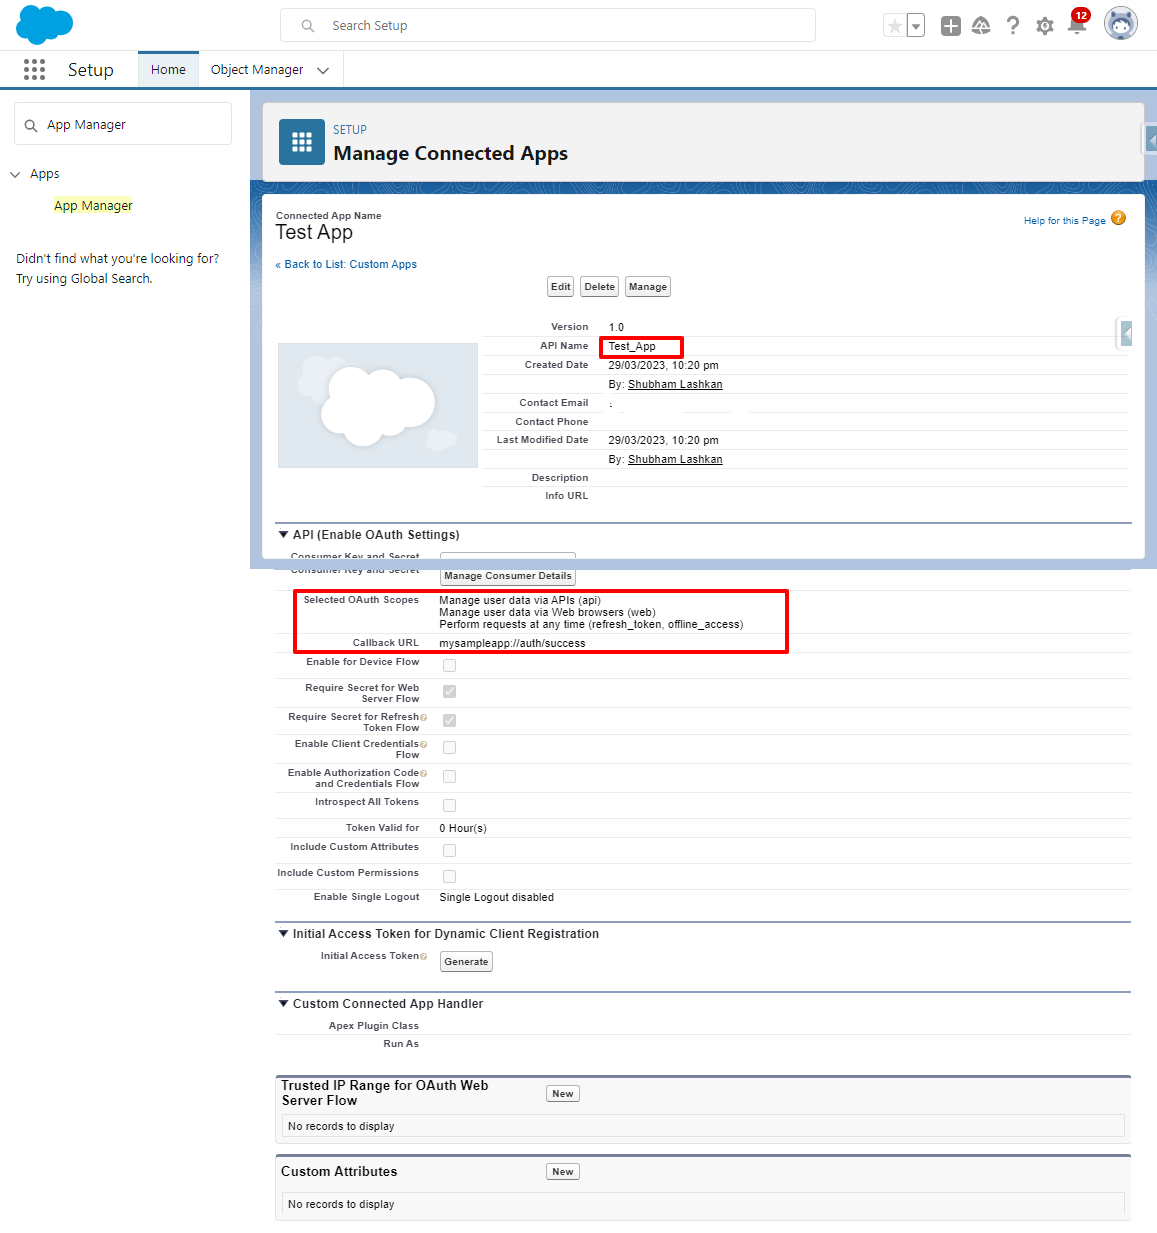
Under API (Enable OAuth Settings), check Enable OAuth Settings.
Set callback URL it can be any URL but copy and store it in a safe place because we will need it while creating Android Project.
Under Available OAuth Scopes select Manage user data via APIs (api), Manage user data via Web browsers (web), Perform requests at any time (refresh_token, offline_access) .
Click on add.
Uncheck the field which says Require Secret for Web Server Flow.
Click on Save it will take 5-10 minutes to create the connected app.
Once the app is created copy the consumer key as we will require it for setting up the android project.
Please cross-check check you have copied callback url & consumer secret for the next steps.
Below is the screenshot of the connected app which I have created.
Step 8: Create an Android Project
For creating the Android Project open the command prompt and run forcedroid create. It will ask you for some basic information like application type, application name, package name, organization name and Output directory.
Remember your project will be created on the present working directory of the command prompt/terminal.
Step 9: Run your Android App
To run our android app we need to make replace the default callback URL & consumer key with the values which we have copied in step 7.
Follow the following steps to run the android app.
Locate the output directory which you have created in step 8 and go to app\res\values\bootconfig.xml.
Open this XML file using text editor and replace remoteAccessConsumerKey value with the consumer key from your connected app and oauthRedirectURI value with the callback URL from your connected app.
Once you are done with replacing both values save the XML file.
Open Android Studio and import the project which you have created using forcedroid create command.
Now you can run the application using the emulator or connected device which is running Android SDK API 23 or later.
When the app launches you will see a Salesforce login screen you need to provide your org username and password and it will ask for a verification code once it is provided you will see 2 buttons for fetching accounts & contacts respectively.
Conclusion
To setup Salesforce Mobile SDK for Native android app development you have to follow 9 simple steps which includes installation of nodejs, npm, git, JDK, Android Studio, Required SDK verson for Android, forcedroid along with creating a connected app in Salesforce org and using the callback url and consumer key in the android project created from forcedroid command line utility.
I hope you find this article helpful.
Please don't forget to like, comment and share and you can also check out my other articles. Also, don't forget to subscribe to my newsletter so you can be notified about new articles.
I am looking to get into technical writing so if you want me to write an article then please connect with me on my Twitter handle here.
Learning Salesforce then do checkout Salesforce Verse: https://salesforceverse.com
Let me also know which topic I should write about next.